If you use the Google Lighthouse system, you can easily detect geolocation permission requests that appear during page loading. The system notices this and presents it as a warning and flags it. Here is an example:
To do this, Google examines all Javascript libraries used during Lighthouse page loading and looks for geolocation.getCurrentPosition() or geolocation.watchPosition() snippets. If the permission is not granted yet, the audit process will fail.
If permission is given before performing the audit, Lighthouse may not work properly. For this reason, before starting the audit, you should definitely do a reset to cancel the previously given permissions.
How to ask users’ locations as UX compatible?
Make sure 100 percent that there are no codes geolocation.getCurrentPosition() and geolocation.watchPosition() in Page load. Later,
Issue geolocation permission after user action is completed.
Note also that users may not want to give you this information.
If you can’t get geolocation permission, use a fallback.
If a transaction requires geolocation, make sure to specify this in advance.
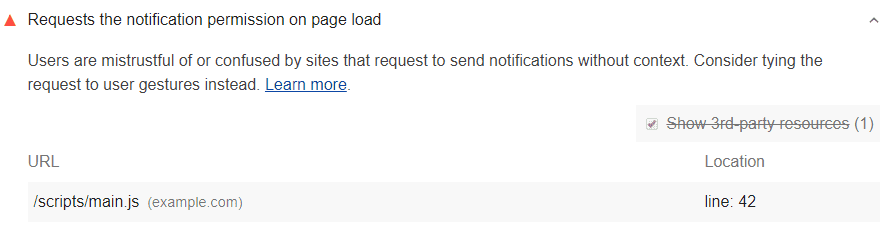
Google Lighthouse converts a relevant situation into a warning like the one below and sends it to you:
To do this, Google Lighthouse checks all Javascript codes processed during page load. This way, if a code has a call like notification.requestPermission(), it is reported that the notification permission already exists. In this case, the audit is completed without a detailed observation.
In such a case, Lighthouse, which cannot see a new notification permission request, may fail to audit. So before starting an audit, be sure to reset the previously given permissions.
Lighthouse provides you with the requests for notification permissions line by line with the URL.
So, how should the notification permissions request be submitted?
There should not be a notification.requestPermission() among the code running during the page load. For a better UX,
Request permission with a specific notification view.
In addition, the request for permission should be shaped by the user’s choice of notification type.
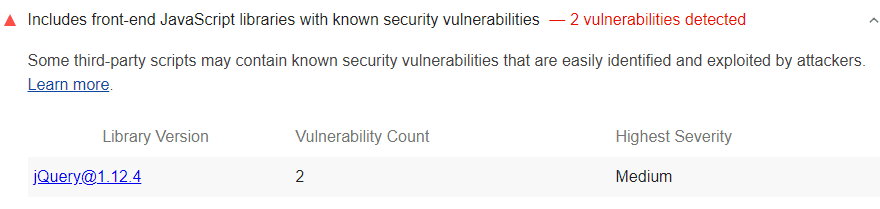
Google Lighthouse flags Javascript codes that show security vulnerability. This way you can detect them right away:
Lighthouse uses the following systems to do this detecting process:
Reviewing the list of detected libraries known with vulnerability problems
Reducing Javascript Libraries with Security Vulnerabilities
Discontinuing the use of libraries after the warning from Google Lighthouse will result in an increase in your website’s SEO score and a positive impact on the user experience. If you do not want to give up the library in question, check if there is a new version of the library that was released with no vulnerabilities. If not, start looking for a different and safer option that performs the same function.
If you want to get more information about the specified security vulnerabilities of the library you are using, click the Library Version tab on the system.
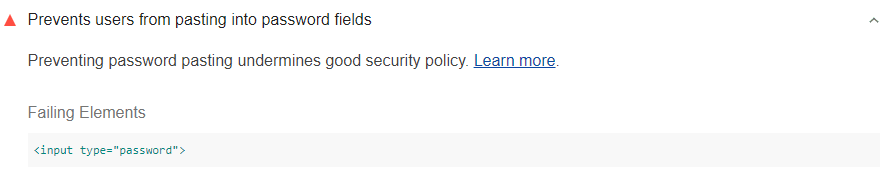
Google Lighthouse flags such situations and notifies you. Like in the image:
The system collects all <input type = "password"> codes to do this. It then pasted into each element. This allows the system to verify that the content of the element is set to be pasted text.
Google lighthouse cannot perform detecting in two situations:
If the page doesn’t use <input type = "password"> code,
If pasting takes place outside of the paste event listener
How to pass the audit? – Finding the code preventing pasting
You can find the code that prevents password pasting by following the steps below:
First, press Control + Shift + J. Mac users can press Command + Option + J. This action will activate Google DevTools.
Try pasting a password into one of the password fields on your page.
DevTools pauses at the first line of the corresponding code.
How to remove the code preventing pasting?
In many cases, the main problem is the code snippet called preventDefault(). You can remove the entire event listener.
let input = document.querySelector('input');

input.addEventListener('paste', (e) => {
  e.preventDefault(); // This is what prevents pasting.
});
Google Lighthouse Detect The Pages Lack of HTML Doctype
Using Google’s Lighthouse tool with Screpy, you can detect pages without Doctype quite easily. Pages without <! DOCTYPE html> code are flagged by the system. Check out the example below:
After receiving a warning like an example above, all you need to do is to provide the declaration of this code snippet and pass the audit.
How To Pass HTML Doctype Audit: Declaration of Doctype
In order to make a Declaration of Doctype, you need to add the relevant code to your HTML document. Don’t forget to add the code at the top of the page. You know what the code is: <! DOCTYPE html>
You will get an image like the example below:
<!DOCTYPE html>
<html lang="en">
…
Now, the problem should be solved.
You can use Lighthouse for Charset Audit Process
Servers and browsers on a website introduce themselves by sending bytes of data to each other. A problem in encoding files can cause errors. Google’s Lighthouse system discovers when there is a problem with character encoding in HTML files while scanning, and sends you a warning about the issue. This warning look as follows:
Lighthouse, which performs the character encoding scanning function, performs a very detailed analysis of this subject. After conducting such an analysis, Lighthouse’s encounter with the following situations may cause it to declare a character encoding:
The <meta charset> element in the head section of a document. If this element is contained in the first 1024 bytes of the document, the error may be solved.
Content-Type HTTP response header element. This type of error code may occur if this item is with a charset directive that does not match the valid IANA humidity.
The non-presence of the byte-order mark may result in such an error.
How To Solve This Problem With Charset: How To Pass An Audit?
You can use two basic methods for this. Let’s examine the methods one by one:
The <meta chartset> element you add into your HTML code may solve the problem.
In the first 1024 bytes of your HTML document, you need to add the <meta charset> element if you want to pass the audit. It is extremely important to have this element especially in the first 1024 bytes, to eliminate the error. So be sure to adjust the settings accordingly. One of the easiest ways to do this is to add the <meta chatset> system directly to the <head> field of your document – to be sure that it is within the first 1024 bytes.
Add Content-Type HTTP Response Header to Your Page
When you examine the above warning reasons, you realize that your web page will need a content-typeHTTP response header. So set up your server to host the content-type HTTP response header. Note that it must also include the charset directive.
Content-Type: text/html; charset=UTF-8
Detecting and Removing Application Cache (AppCache) from Website
You can use the Google Lighthouse system to detect the Application Cache on your website. When Lighthouse sees a relevant situation on your page, it will automatically flag it and notify you. This notification will look like this:
When the audit system gives you the above warning, it offers you an html tag related to the webpage in question to enable you to find the Application Cache and migrate from it. In this way, you can easily go to the relevant page and make necessary adjustments. See below for an example:
<html manifest="example.appcache">
  ...
</html>
You Can Use Cache API After Abandoning Application Cache (AppCache)
After the warning you see, you need to get rid of Application Cache in order to bypass the control in question. Instead, you can provide the same functionality with the Cache API.
What To Do?
You will have to leave Application Cache on your website and switch to other service workers. To do this, you can use the sw-appcache-behavior library. When you use this library, you will benefit from service-worker-based implementation of the behavior. This system will also allow you to take advantage of the similar functionality of the service offered in Application Cache.
You can also check the content named ‘’Webpage does not respond with a 200 offline’’ to find more information about the use of service workers systems and enabling websites to work offline through these systems.
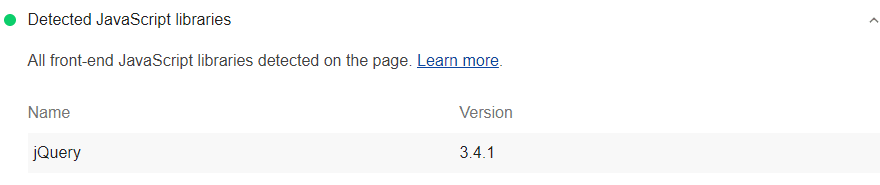
Learning Which Libraries Are Used By Your Page
You can use the Google Lighthouse system to detect the Javascript libraries your site uses. The system lists the related systems found on your page, as in the photo below:
Google Lighthouse doesn’t just report the libraries your website uses. In addition, Javascript snippets and libraries with security risks are also listed by Lighthouse and reported to you. In this way, it becomes possible to take future precautions regarding the security of your website.
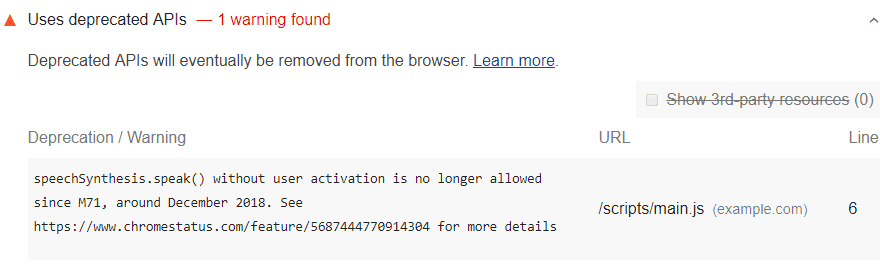
Checking Deprecated APIs Using Lighthouse and Removing Them From Your Website
Step 1: Detecting Deprecated APIs
By using Google’s Lighthouse system, you can remove the deprecated API from your website. The Lighthouse system automatically allows the current deprecated APIs to be flagged. This situation falls on your system as a warning. Check out the photo below as an example:
The Lighthouse system notifies you of all such changes linked to Chrome via the DevTools Console. This way, you can be sure that nothing misses your sight.
Step 2: Removing Deprecated APIs
In order to remove the deprecated APIs you have detected via Google Lighthouse, you need to go to Chrome Platform Status. Click on the link to go right now. Then take action on the subject by expanding the entries in the APIs list you use.
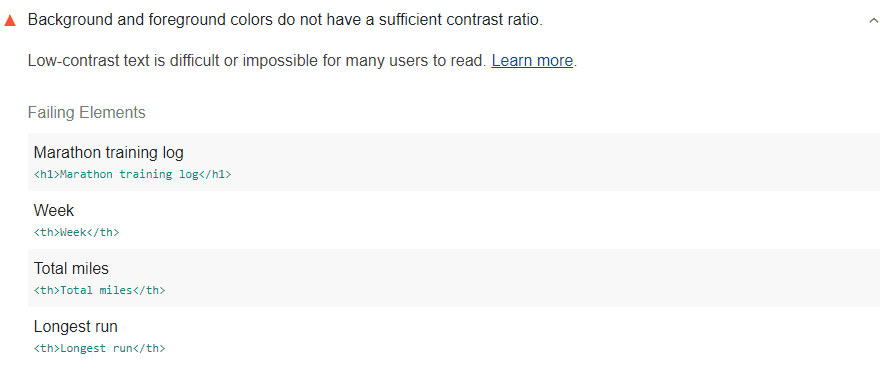
Lighthouse scans the content on each page on your website and flags the parts with a low contrast ratio as a result of this scan. You can actively monitor your site thanks to Lighthouse and view notifications about points where you do not have a sufficient contrast ratio. Of course, the system you use must have a very powerful visual evaluation software for this. Lighthouse uses criterion 1.4.3 from WCAG 2.1 for accurate evaluation and detailed analysis. According to this system;
A text with 18 points or 14 points and bold should take a value like 3: 1 as a contrast ratio.
The required value for all other texts in this regard is determined as 4.5: 1.
While analyzing your page, Lighthouse may not be able to analyze the text content superimposed on an image. Because the audit system works effectively only for contents that are directly entered as text.
Did you know that?
According to WCAG version 2.1, the system now covers user interface elements and images in color contrast requirements. Lighthouse does not provide this service as an extra, but we recommend that you manually perform this check to make sure your entire site is 100 percent user-friendly, including user interface elements and images.
Does your website have a sufficient color contrast ratio?
We learned the answer to the question of what is the color contrast ratio. This time, we will take a look at whether you will adequately realize this factor, which is shown among the ways to increase user experience on the website.
It is extremely important that you comply with the most basic requirements set by the WCAG system, make sure that the rates just mentioned are provided to your website. Remember:
3: 1 ratio for 18 point texts,
3: 1 ratio for 14 point and bold content
4.5: 1 ratio for all other content
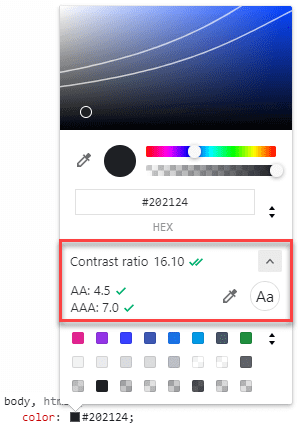
Using Chrome DevTools, you can easily get the color that will keep the content on your website in line with the required basic contrast ratios. For this, you may be asking the question of how to use Chrome DevTools. Here are the basic steps to do this:
First of all, right-click on the image you want to check. If you’re using a Mac, you can click the Command key.
Then click on the Inspect option.
Click the Styles option that comes up and chooses Elements.
Then choose the color value from the options that appear.
You need to click on the color thumbnail located right next to Value. In this way, you will examine the color transitions in the thumbnail that will appear and you will be able to choose colors with the color picker tool in a short time. Under each hue, you will find the contrast ratio of the color you choose along with your current color.
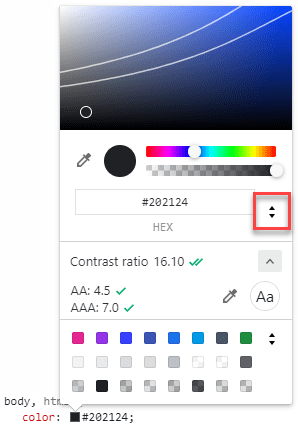
Manually selecting the color over the thumbnail can be really tiring sometimes. Therefore, you can use the up and down arrows next to the color code to increase and decrease the tone of the color. You will see that the contrast ratio is reconstructed with slight differences. This is also a very good way to have a point-to-point ratio.
The process of deciding on color value can be completed in this way. The next thing you need to do is upgrade your project to CSS.
For a maximized user experience model on your website, it may be necessary to check not only images but also more complex areas over gradients. For example, Google DevTools is also very useful to correctly adjust the color contrast of a text on an image. You can also use the color picker thumbnail system to choose the background that will appear behind the text. When making a selection for this, contrast ratio information will be given to you automatically at the bottom.
Why DOM size is important?
We now know that Excessive DOM size negatively impacts web performance. So how exactly does it do this? Let’s examine it together!
The decrease in Network Efficiency & Load Performance
The high DOM size causes decrease in network efficiency and load performance. Having a high DOM tree means a lot of actors that need to be loaded with the page. Loading a large number of details that are not even visible to the user each time causes the page to open much more slowly and reduces the user experience.
The decrease in Runtime Performance
The higher the DOM size, the lower the runtime performance. Runtime performance is a metric that measures how your website performs while running in the normal process, not while it is being loaded. The large size of DOM causes you to experience a slowdown in standard running times.
The process is like this: Each time a user enters your web page, the browser continuously recomputes the position and styling of nodes. The more complex it takes to perform this recomputing process, the slower the rendering will be.
The decrease in Memory Performance
At this point, you need to check your JavaScript. The high size of DOM sometimes results in general query selections that will probably reduce your memory performance. Because in such a case, you may be storing a large number of references to a high number of nodes. This will cause your memory performance to decrease in users’ devices.
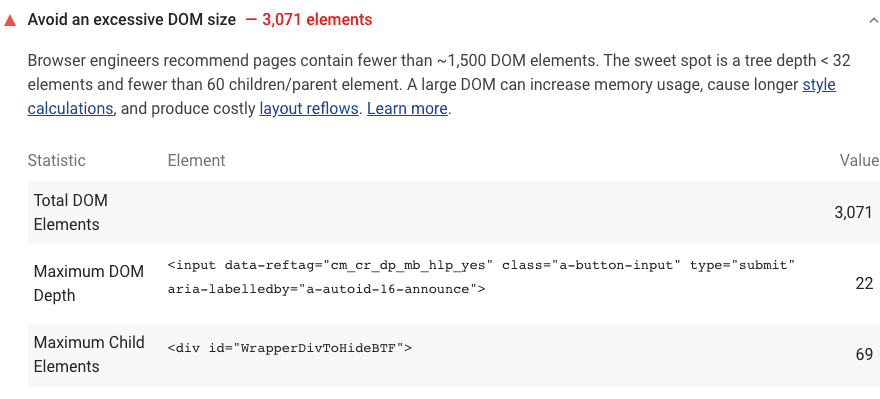
Using Lighthouse to Avoid Excessive DOM Size
What Google Lighthouse does is pretty simple. System;
Outputs a report of the total DOM elements within a page.
Calculates the maximum DOM depth of a page.
Calculates the maximum DOM child elements of a page.
Let’s also list the DOM data requested by Google and many other browser tools. Which DOM Trees are flagged by Lighthouse? Here are they:
Pages with more than 1500 nodes are flagged.
Pages with depths greater than 32 nodes are flagged.
Pages hosting parent nodes with 60 child nodes are flagged.
What Can You Do To Optimize DOM Size?
So, what are the main ways to optimize the DOM for you, especially as requested by Google and other browser systems?
The main thing you need to do is use systems that will destroy unnecessary DOMs and generate the necessary ones at the right time. What does it mean?
When to create nodes?
For example, let’s say you are currently submitting a large DOM tree. In this case, all you have to do is load your page. Then to determine in detail which nodes are shown. After taking your note, you will have the chance to destroy the invisible nodes that are not displayed on the page. You should only generate those nodes when the user has a behavior that will cause you to display the nodes in question, for example when the user exhibits an expected scroll behavior or clicks a button.
What if you cannot avoid a large DOM tree?
If it is not possible to reduce the large DOM tree you have due to some software features of your web page, let’s tell you what to do: Simplify CSS selectors. In this way, you will improve rendering performance. Google has content on Reduce the Scope and Complexity of Style Calculations. You can also have a look at it.
Scrolling performance issues are an extremely important factor in both Google and many search engines. In SEO optimization, scrolling is expected to provide a quality experience as well as speed or content performance of a web page. To improve scrolling performance, we recommend that you be open to using new generation solutions.
Browser Compatibility of this Solution
Many browsers that are popular today work in harmony with passive event listeners. This makes it more advantageous to use this optimization tool.
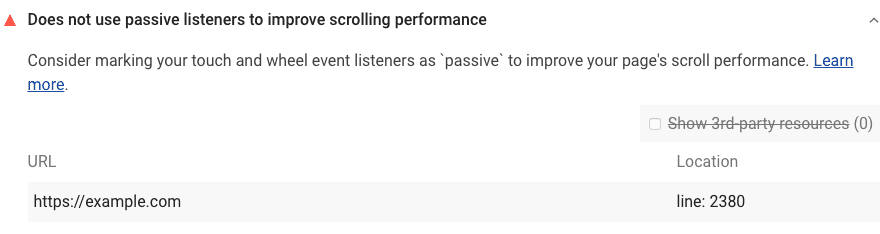
How Does Lighthouse passive event listener audit fails in scrolling
Thanks to Lighthouse, you can easily get information that event listeners on your website reduce the scrolling performance of users because Google Lighthouse flags this information and presents it to you.
Lighthouse applies various analysis steps to catch that event listeners negatively affect the overall scrolling experience of your visitors. These steps are as follows:
The system gathers all event listeners on one page.
Non-touch and non-wheel listeners within the website are filtered.
Listener actors that call PreventDefault () are filtered out.
Listeners coming from a different host than the host on which the page is located are filtered.
Why Does Screpy Filter All These Listeners?
Google Lighthouse filters listeners from external hosts for understanding the problem that causes decreased scrolling performance on your website. Because it assumes that you have no control over listeners from other hosts. Therefore, listeners from third parties that have negative effects on your website’s scrolling experience do not need to be included in the Google Lighthouse report.
While performing optimization work through Screpy, you will have the chance to benefit from all features of Google Lighthouse. Moreover, the fact that this tool is designed directly by Google helps you to get the best results.
How to transform event listeners into passive event listeners (for boosting scrolling performance)?
You now know that boosting scrolling performance has many positive effects on overall website power. It will be necessary to add a passive flag to each event listener to prevent them from negatively affecting the user experience.
Also, the browser you use can be a tool only that offers passive event listener support. In this case, just add the flag to the code. As an example, you can review the code below.
In some cases, browsers with un-updated, non-modern systems do not support passive event listeners. For these situations, you can use two different tools:
Feature detection
Polyfill.
We will be providing you with detailed information about these tools and methods
Using Lighthouse for Detailed Scoring
To optimize your scrolling performance with your general Lighthouse score can be a good idea. So, have a look at the score interpretation of Google Lighthouse.
Lighthouse uses a large number of metrics to determine a webpage’s score. Get the following information from the report provided to you by Lighthouse:
The score given to you may have values as following:
If it is between 0 and 49, it means you have poor performance. It is denoted by red.
If it is between 50 and 89, it means you have “needs improvement” performance. It is denoted by Orange.
If it is between 90 and 100, it means you have good performance. It is shown in green.
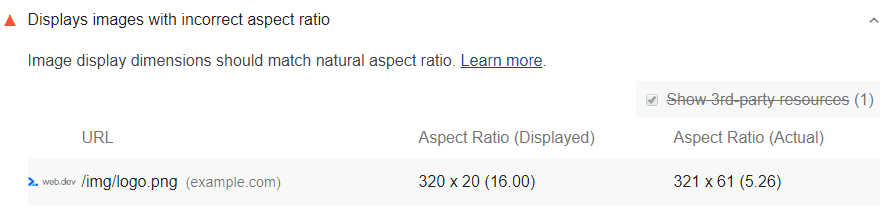
What is the aspect ratio?
The aspect ratio can be defined as the ratio of the length of an image to its width. When deciding on the size of the image you use in any area of your website, you consider the requirements of your theme, right? What about the quality of the image you use?
We now know that the aspect ratio should not be different from the original. So, how to find the aspect ratio of the original image? Lighthouse saves you from this trouble. The aspect ratio of the image you are using is calculated by the system and a deviation of more than 5 percent from the original aspect ratio is flagged. In this way, you can examine which images you need to edit or change over the system.
Generally, we can say that there are two different reasons why an image has an aspect ratio that can degrade quality:
The image you use may have been resized according to different heights and widths after being taken from its original source.
The image you use is reshaped according to the container where the image is located and of which size is variable.
In both cases, we can say that the image differs from its original aspect ratio and therefore loses the resolution it should have.
So what can be done? Follow the steps below!
Perform optimization using Image CDN.
If you do not want to give up the image you are using, you can resize it with Image CDN. CDN makes it easier to obtain images with new dimensions.
Have you checked the CSS settings?
Some changes in the CSS settings can cause corruption in the aspect ratio of the image you are using. You can use Chrome DevTools to view these CSS settings.
Have you checked the length and height of the photo you use in HTML?
If you want to make sure that the image is loading at the correct proportions you specify in the browser, it may be a good method to check the properties of the image on the HTML page.
However, many platforms today work with responsive images. While working with these, there is no way to know about the height and width without knowing the viewport dimensions. When faced with this kind of situation, choose to take advantage of the CSS Aspect Ratio library. Also, you can use the aspect ratio boxes to ensure that the responsive images you use maintain the ratio you specify at a high rate.
What Will You Gain After Aspect Ratio Optimization?
So, what will your site earn with all these things you do? In short, what is the benefit of using the correct aspect ratio for the website?
Website Speed: Optimized images boost your website speed! You now know how important website speed is for user experience.
SEO: In order to increase your website’s SEO score, it is important that the aspect ratio of images is accurate. So, how does images affect SEO? Having the right structural features of Images increases your site speed. The increase in the speed of the site means that the search engines love you more.
Lower Bandwidth: You will have lower bandwidth, which will be appreciated by browsers and networks.